Learn ReactJs

To Know more about ReactJs with the Restful API

Angular JS - Best Framwork

Learn New ideas and techique about the framework.

This is default featured slide 3 title

Go to Blogger edit html and find these sentences.Now replace these sentences with your own descriptions.

This is default featured slide 4 title

Go to Blogger edit html and find these sentences.Now replace these sentences with your own descriptions.

This is default featured slide 5 title

Go to Blogger edit html and find these sentences.Now replace these sentences with your own descriptions.

React

React
Fundamental of React Js

Tuesday, January 14, 2020

Learn

Summary: this tutorial introduces you to the basic of the SQL Server SELECT statement, focusing on how to query against a single table.

Basic SQL Server SELECT statement

Database tables are objects that stores all the data in a database. In a table, data is logically organized in a row-and-column format which is similar to a spreadsheet.

In a table, each row represents a unique record and each column represents a field in the record. For example, the  customers table contains customer data such as customer identification number, first name, last name, phone, email, and address information as shown below:

Customers table

SQL Server uses schemas to logically groups tables and other database objects. In our sample database, we have two schemas: sales and production. The sales schema groups all the sales related tables while the production schema groups all the production related tables.

To query data from a table, you use the SELECT statement. The following illustrates the most basic form of the SELECT statement:

SELECT
    select_list
FROM
    schema_name.table_name;

In this syntax:

  • First, specify a list of comma-separated columns from which you want to query data in the SELECT clause.
  • Second, specify the source table and its schema name on the FROM clause.

When processing the SELECT statement, SQL Server processes the FROM clause first and then the SELECT clause even though the SELECT clause appears first in the query.

SQL Server SELECT - clause order evaluation

QL Server SELECT statement examples

Let’s use the customers table in the sample database for the demonstration.

A) SQL Server SELECT – retrieve some columns of a table example

The following query finds the first name and last name of all customers:

SELECT
    first_name,
    last_name
FROM
    sales.customers;

Here is the result:

sql server select - some columns

The result of a query is called a result set.

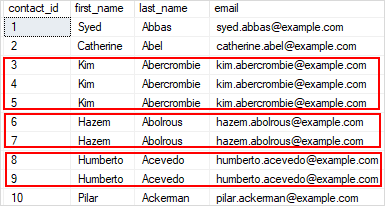
The following statement returns the first names, last names, and emails of all customers:

SELECT
    first_name,
    last_name,
    email
FROM
    sales.customers;
sql server select - select three columns

B) SQL Server SELECT – retrieve all columns from a table example

To get data from all columns of a table, you can specify all the columns in the select list. You can also use SELECT * as a shorthand to save some typing:

SELECT
    *
FROM
    sales.customers;
sql server select - select all columns

The SELECT * is useful for examining the columns and data of a table that you are not familiar with. It is also helpful for ad-hoc queries.

However, you should not use the SELECT * for real production code due to the following main reasons:

  1. First, SELECT * often retrieves more data than your application needs to function. It causes unnecessary data to transfer from the SQL Server to the client application, taking more time for data to travel across the network and slowing down the application.
  2. Second, if the table is added one or more new columns, theSELECT * just retrieves all columns that include the newly added columns which were not intended for use in the application. This could make the application crash.

C) SQL Server SELECT – sort the result set

To filter rows based on one or more conditions, you use a WHERE clause as shown in the following example:

SELECT
    *
FROM
    sales.customers
WHERE
    state = 'CA';
sql server select - where clause

In this example, the query returns the customers who locate in California.

When the WHERE clause is available, SQL Server processes the clauses of the query in the following sequence: FROMWHERE, and SELECT.

SQL Server SELECT - from where select

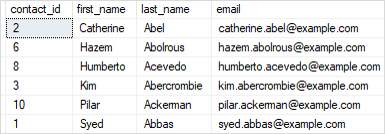
To sort the result set based on one or more columns, you use the ORDER BY clause as shown in the following example:

SELECT
    *
FROM
    sales.customers
WHERE
    state = 'CA'
ORDER BY
    first_name;
sql server select - order by clause

In this example, the ORDER BY clause sorts the customers by their first names in ascending order.

In this case, SQL Server processes the clauses of the query in the following sequence: FROMWHERESELECT, and ORDER BY.

SQL Server SELECT - from where select order by

D) SQL Server SELECT – group rows into groups example

To group rows into groups, you use the GROUP BY clause. For example, the following statement returns all the cites of customers located in California and the number of customers in each city.

SELECT
    city,
    COUNT (*)
FROM
    sales.customers
WHERE
    state = 'CA'
GROUP BY
    city
ORDER BY
    city;
sql server select - group by clause

In this case, SQL Server processes the clauses in the following sequence: FROMWHEREGROUP BYSELECT, and ORDER BY.

E) SQL Server SELECT – filter groups example

To filter groups based on one or more conditions, you use the HAVING clause. The following example returns the city in California which has more than 10 customers:

SELECT
    city,
    COUNT (*)
FROM
    sales.customers
WHERE
    state = 'CA'
GROUP BY
    city
HAVING
    COUNT (*) > 10
ORDER BY
    city;
sql server select - having clause

Notice that the WHERE clause filters rows while the HAVING clause filter groups.

In this tutorial, you have learned how to use the SQL Server SELECT statement to query data from a single table


from WordPress https://ift.tt/3a6UKUz
via IFTTT

Learn

Section 1. Querying data

This section helps you learn how to query data from the SQL Server database. We will start with a simple query that allows you to retrieve data from a single table.

  • SELECT – show you how to query data against a single table.

Section 2. Sorting data

  • ORDER BY – sort the result set based on values in a specified list of columns

Section 3. Limiting rows

  • OFFSET FETCH – limit the number of rows returned by a query.
  • SELECT TOP – limit the number of rows or percentage of rows returned in a query’s result set.

Section 4. Filtering data

  • DISTINCT  – select distinct values in one or more columns of a table.
  • WHERE – filter rows in the output of a query based on one or more conditions.
  • AND – combine two Boolean expressions and return true if all expressions are true.
  • OR–  combine two Boolean expressions and return true if either of conditions is true.
  • IN – check whether a value matches any value in a list or a subquery.
  • BETWEEN – test if a value is between a range of values.
  • LIKE  –  check if a character string matches a specified pattern.
  • Column & table aliases – show you how to use column aliases to change the heading of the query output and table alias to improve the readability of a query.

Section 5. Joining tables

  • Joins – give you a brief overview of joins types in SQL Server including inner join, left join, right join and full outer join.
  • INNER JOIN – select rows from a table that have matching rows in another table.
  • LEFT JOIN – return all rows from the left table and matching rows from the right table. In case the right table does not have the matching rows, use null values for the column values from the right table.
  • RIGHT JOIN – learn a reversed version of the left join.
  • FULL OUTER JOIN – return matching rows from both left and right tables, and rows from each side if no matching rows exist.
  • CROSS JOIN – join multiple unrelated tables and create Cartesian products of rows in the joined tables.
  • Self join – show you how to use the self-join to query hierarchical data and compare rows within the same table.

Section 6. Grouping data

  • GROUP BY– group the query result based on the values in a specified list of column expressions.
  • HAVING – specify a search condition for a group or an aggregate.
  • GROUPING SETS – generates multiple grouping sets.
  • CUBE – generate grouping sets with all combinations of the dimension columns.
  • ROLLUP – generate grouping sets with an assumption of the hierarchy between input columns.

 Section 7. Subquery

This section deals with the subquery which is a query nested within another statement such as SELECT, INSERT, UPDATE or DELETE statement.

  • Subquery – explain the subquery concept and show you how to use various subquery type to select data.
  • Correlated subquery – introduce you to the correlated subquery concept.
  • EXISTS – test for the existence of rows returned by a subquery.
  • ANY – compare a value with a single-column set of values returned by a subquery and return TRUE the value matches any value in the set.
  • ALL – compare a value with a single-column set of values returned by a subquery and return TRUE the value matches all values in the set.

Section 8. Set Operators

This section walks you through of using the set operators including union, intersect, and except to combine multiple result sets from the input queries.

  • UNION – combine the result sets of two or more queries into a single result set.
  • INTERSECT – return the intersection of the result sets of two or more queries.
  • EXCEPT – find the difference between the two result sets of two input queries.

Section 9. Common Table Expression (CTE)

  • CTE – use common table expresssions to make complex queries more readable.
  • Recursive CTE – query hierarchical data using recursive CTE.

Section 10. Pivot

  • PIVOT – convert rows to columns

Section 11. Modifying data

In this section, you will learn how to change the contents of tables in the SQL Server database. The SQL commands for modifying data such as insert, delete, and update are referred to as data manipulation language (DML).

  • INSERT – insert a row into a table
  • INSERT multiple rows – insert multiple rows into a table using a single INSERT statement
  • INSERT INTO SELECT – insert data into a table from the result of a query.
  • UPDATE – change the existing values in a table.
  • UPDATE JOIN – update values in a table based on values from another table using JOIN clauses.
  • DELETE – delete one or more rows of a table.
  • MERGE – walk you through the steps of performing a mixture of insertion, update, and deletion using a single statement.

Section 12. Data definition

This section shows you how to manage the most important database objects including databases and tables.

  • CREATE DATABASE – show you how to create a new database in a SQL Server instance using the CREATE DATABASE statement and SQL Server Management Studio.
  • DROP DATABASE – learn how to delete existing databases.
  • CREATE SCHEMA – describe how to create a new schema in a database.
  • ALTER SCHEMA – show how to transfer a securable from a schema to another within the same database.
  • DROP SCHEMA – learn how to delete a schema from a database.
  • CREATE TABLE – walk you through the steps of creating a new table in a specific schema of a  database.
  • Identity column – learn how to use the IDENTITY property to create the identity column for a table.
  • Sequence – describe how to generate a sequence of numeric values based on a specification.
  • ALTER TABLE ADD column – show you how to add one or more columns to an existing table
  • ALTER TABLE ALTER COLUMN – show you how to change the definition of existing columns in a table.
  • ALTER TABLE DROP COLUMN – learn how to drop one or more columns from a table.
  • Computed columns – how to use the computed columns to resue the calculation logic in multiple queries.
  • DROP TABLE – show you how to delete tables from the database.
  • TRUNCATE TABLE – delete all data from a table faster and more efficiently.
  • SELECT INTO – learn how to create a table and insert data from a query into it.
  • Rename a table –  walk you through the process of renaming a table to a new one.
  • Temporary tables – introduce you to the temporary tables for storing temporarily immediate data in stored procedures or database session.
  • Synonym – explain you the synonym and show you how to create synonyms for database objects.

Section 13. SQL Server Data Types

  • SQL Server data types – give you an overview of the built-in SQL Server data types.
  • BIT – store bit data i.e., 0, 1, or NULL in the database with the BIT data type.
  • INT – learn about various integer types in SQL server including BIGINT, INT, SMALLINT, and TINYINT.
  • DECIMAL – show you how to store exact numeric values in the database by using DECIMAL or NUMERIC data type.
  • CHAR – learn how to store fixed-length, non-Unicode character string in the database.
  • NCHAR –  show you how to store fixed-length, Unicode character strings and explain the differences between CHAR and NCHAR data types
  • VARCHAR – store variable-length, non-Unicode string data in the database.
  • NVARCHAR – learn how to store variable-length, Unicode string data in a table and understand the main differences between VARCHAR and NVARCHAR.
  • DATETIME2 – illustrate how to store both date and time data in a database.
  • DATE – discuss the date data type and how to store the dates in the table.
  • TIME – show you how to store time data in the database by using the TIME data type.
  • DATETIMEOFFSET – show you how to manipulate datetime with the time zone.
  • GUID – learn about the GUID and how to use the NEWID() function to generate GUID values.

Section 14. Constraints

  • Primary key  – explain you to the primary key concept and show you how to use the primary key constraint to manage a primary key of a table.
  • Foreign key – introduce you to the foreign key concept and show you use the FOREIGN KEY constraint to enforce the link of data in two tables.
  • NOT NULL constraint – show you how to ensure a column not to accept NULL.
  • UNIQUE constraint – ensure that data contained in a column, or a group of columns, is unique among rows in a table.
  • CHECK constraint – walk you through the process of adding logic for checking data before storing them in tables.

Section 15. Expressions

  • CASE – add if-else logic to SQL queries by using simple and searched CASE expressions.
  • COALESCE – handle NULL values effectively using the COALESCE expression.
  • NULLIF – return NULL if the two arguments are equal; otherwise, return the first argument.

Section 16. Useful Tips

  • Find duplicates – show you how to find duplicate values in one or more columns of a table.
  • Delete duplicates – describe how to remove duplicate rows from a table.


from WordPress https://ift.tt/2QPzIC8
via IFTTT

Monday, January 13, 2020

Learn

Summary: in this tutorial, you will learn how to delete duplicate rows from a table in SQL Server.

To delete the duplicate rows from the table in SQL Server, you follow these steps:

Let’s set up a sample table for the demonstration.

Setting up a sample table

First, create a new table named sales.contacts as follows:

DROP TABLE IF EXISTS sales.contacts;
 
CREATE TABLE sales.contacts(
    contact_id INT IDENTITY(1,1) PRIMARY KEY,
    first_name NVARCHAR(100) NOT NULL,
    last_name NVARCHAR(100) NOT NULL,
    email NVARCHAR(255) NOT NULL,
);

Second, insert some rows into the sales.contacts table:

INSERT INTO sales.contacts
    (first_name,last_name,email) 
VALUES
    ('Syed','Abbas','syed.abbas@example.com'),
    ('Catherine','Abel','catherine.abel@example.com'),
    ('Kim','Abercrombie','kim.abercrombie@example.com'),
    ('Kim','Abercrombie','kim.abercrombie@example.com'),
    ('Kim','Abercrombie','kim.abercrombie@example.com'),
    ('Hazem','Abolrous','hazem.abolrous@example.com'),
    ('Hazem','Abolrous','hazem.abolrous@example.com'),
    ('Humberto','Acevedo','humberto.acevedo@example.com'),
    ('Humberto','Acevedo','humberto.acevedo@example.com'),
    ('Pilar','Ackerman','pilar.ackerman@example.com');

Third, query data from the sales.contacts table:

SELECT 
   contact_id, 
   first_name, 
   last_name, 
   email
FROM 
   sales.contacts;

The following picture shows the output of the query:

SQL Server Delete Duplicates

There are many duplicate rows (3,4,5), (6,7), and (8,9) for the contacts that have the same first name, last name, and email.

Delete duplicate rows from a table example

The following statement uses a common table expression (CTE) to delete duplicate rows:

WITH cte AS (
    SELECT 
        contact_id, 
        first_name, 
        last_name, 
        email, 
        ROW_NUMBER() OVER (
            PARTITION BY 
                first_name, 
                last_name, 
                email
            ORDER BY 
                first_name, 
                last_name, 
                email
        ) row_num
     FROM 
        sales.contacts
)
DELETE FROM cte
WHERE row_num > 1;

In this statement:

  • First, the CTE uses the ROW_NUMBER() function to find the duplicate rows specified by values in the first_namelast_name, and email columns.
  • Then, the DELETE statement deletes all the duplicate rows but keeps only one occurrence of each duplicate group.

SQL Server issued the following message indicating that the duplicate rows have been removed.


If you query data from the sales.contacts table again, you will find that all duplicate rows are deleted.

SELECT contact_id, 
       first_name, 
       last_name, 
       email
FROM sales.contacts
ORDER BY first_name, 
         last_name, 
         email;
SQL Server Delete Duplicate Rows Result

In this tutorial, you have learned how to delete duplicate rows from a table in SQL Server.


from WordPress https://ift.tt/38307Ch
via IFTTT

Thursday, January 2, 2020

Learn

Architecture of React Native

Pre-Requisites

1. Hardware requirements

RAM: 8 GB (If you are going to use the emulator on your machine).

2. Software requirements

Software Version
Android studio (IDE) 2.2.3
Android Sdk 25.0.2
Java 1.8.0_121
Node Js 4.2.6
NPM 3.5.2
React native cli 2.0.1

React Native setup for Windows

First, you’ll need to install the node on your machine. If you already have node js skip the node installation steps, otherwise follow the below steps.

Node JS installation:

Download the latest node js.

Run the downloaded .msi file and follow the prompts to install.

Node.js. The installer should set the C:/Program Files/nodejs/bin directory in windows PATH environment variable by default if is not you have to set the PATH. Restart any open command prompts for the change to take effect.

Make sure node and npm are installed by typing the below commands

node -v  
npm -v

React native:

After installing the node in your system, you  can install react native by typing the following command in the terminal

npm install -g react-native-cli

Android Development Environment:

Android studio helps you to run the react native app in an emulator and test the app. The installation process of the Android studio is explained below.

Download and install Android Studio

Download the Android Studio. And run the .exe file, make sure you installed Java.

Android studio requires java.

It opens the window like given below, click next to start the installation.

Below the image initiating JDK to android SDK.

Select the components, which are required to create the applications (Android Studio, Android SDK, Android Virtual Machine and Performance (Intel chip)).

Specify the location to the Android studio and Android SDK

Specify the RAM to the Android emulator. By default, this should be 512 MB.

Finally, it extracts the packages to the local machine and will take some time to complete. Post the extraction, click the finish button and it will open the Android studio project with Welcome to Android studio message.

To create Android virtual Device:

Open the Android Studio and launch the AVD Manager clicking the AVD_Manager icon. Click the create a new virtual device and configure the device specification.

After clicking the finish button it will list the devices like in the above window.You can run the device by clicking the run button

Set up the ANDROID_HOME environment variable:

To run the react native app in emulator you need to setup the ANDROID_HOME environment variable

To setup the environment, right click on Computer → Advanced System Settings → Environment variables → New, then enter the path to your Android SDK.

Restart the Command Prompt to apply the new environment variable.

Create the First React native Project

We will create our first project by running the below command in the terminal from the folder where we want to create the app.

react-native init MySampleApp

Go to that folder,

cd MySampleApp

run the command to start package, make sure you started the emulator.

react-native start
react-native run-android

The sample project will be opened in the emulator.

That it 🙂


from WordPress https://ift.tt/2ZKyZFa
via IFTTT